
When I finished building the Workbench Rolling Cart and hammering the build documentation into a reasonable set of instructions, I felt like it was a solid effort. It's portable, it holds a ton of stuff, and converts into a workbench in seconds. With the extension table add-ons, it turns into a breakdown table for a full sheet of plywood. You can slap a 4x8 down and directly use the track saw. (The sacrificial strips on the extension table are stealthy, handy, and replaceable.)

Only minutes after I posted the project and design on some woodworking forums, I got some questions about the extension tables.
- Do they transport with the Rolling Cart as a unit?
- Are they foldable in the same way that the WRoC converts from workbench to rolling cart?
- How much space do the extension table pieces take up in the garage?
I felt a bit sheepish. From a transport and portability perspective, these extension tables just aren't as good as the Cart. I have mine stashed on the ceiling of my garage, hooked just above the garage door.

If I had to take them down the street to my neighbor's cabinet project, it would be three trips - one for the WRoC, and one each for the extension table pieces. So much for the portable messiah.
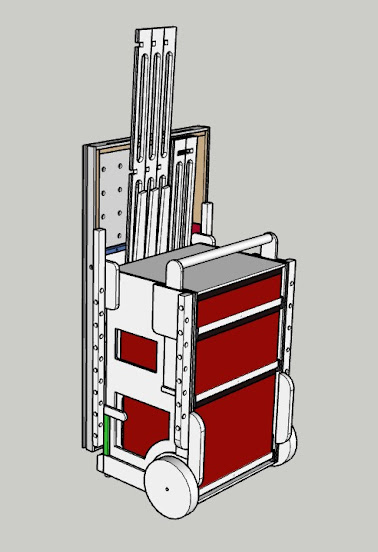
I updated the design in SketchUp, and added a little 'cradle' that hooks onto the dog holes of the stowed workbench. But in my heart of hearts it looks unwieldy. If the CEO of Dog Island Offcuts was a jerk and had us park in the employee lot out to the west, and drag our tools a quarter-mile on decent pavement to the job site, I might bring this out. But it could definitely 'be better'.

I'm putting the finishing touches on the next Dog Island Offcuts workshop helper - a breakdown table that folds up against the wall and supports a full sheet of plywood on latticed sacrificial truss supports. And the notion of lattices started to stick in my brain. The extension tables are basically a bunch of connected rectangles that take the place of large flat surface of a table. Anytime a connected rectangular frame is in the conversation, it could be configured into a snap-together lattice. So I started to poke at the extension tables with the goal of improvement and - at least - being able to break down the frames into flat component parts. Viva Ikea!
The current extension table design uses T-Track bolts and knobs to securely attach the extensions to the WRoC workbench. It would be tricky to do a lattice design with the pokey ends and duplicate this flat connection butted up against the T-Track. But I figured that a T-Track bolt could be placed on the end of an extension board. As long as it slid into the T-Track and stayed in position, it wouldn't need to be fully tightened down.
So this is what came out.

Three long supports that connect to the T-Track on the workbench, each with a folding leg. Four cross/middle supports. All pieces retain the sacrificial top edge, and are relieved with oval slots for weight reduction and to provide a place to stash the track saw guide between cuts.

The lattice gridwork keeps the long supports vertical, and spaced evenly. With the lattice grid established and stabilized, it is sufficient to have the loose t-track bolts as an anchor point. Slide the long pieces into the t-track, extend the legs, and drop in the cross supports to assemble the extension table.
We lose a small amount of functionality. I can't split the extensions on either side of the workbench to make a long table in the shape of a 'Tee'.

I suppose that I could make a set of cross supports make up half a table. Bring out the parts that fit the job. Extension table meets Lincoln Logs.

But if you have a shop that leverages portability and transport, and primarily use the extensions for large plywood breakdown and assembly, this might be better than the previous extension design.

I tried snapping the ''stowed' extension table pieces into the 'stowed' WRoC in the SketchUp model, and it didn't immediately fit - tolerances are a little tight and the accessory shelf bracket on the back of the workbox gets in the way. . But then I tilted it a little bit and used some empty space creatively. SketchUp isn't a perfect tool, but it looks like it might fit with a sixteenth of an inch to spare on the top edge of the workbox! It will probably help that 3/4" plywood is usually just a smidge thinner than 3/4". When these parts are turned sideways and packed for storage, every sixteenth counts.

If nothing else, these 'latticed' extension table pieces will stow away in the garage far easier than the 'fixed framework' extension table grids.
The proof of a good fit will be seen if I actually build this. For now, , I am putting this post on the blog. The plans for the WRoC carts are being updated with this additional design, and I am sending the update out to anyone who has already purchased a set of plans.
Comments
Post a Comment